[This could also have been titled ANTLR4 project with Maven – Tutorial (episode 4)]
[The full source code is here on github]
Introduction
ASM is:
…an all purpose Java bytecode manipulation and analysis framework. It can be used to modify existing classes or dynamically generate classes, directly in binary form. Provided common transformations and analysis algorithms allow to easily assemble custom complex transformations and code analysis tools.
It has several uses but the most remarkable is the ability to easily output Java Bytecode and dump byte array representations of class files.
In order to allow this, ASM has a set of handy APIs and a couple of tools that guides you by examples, rather that teaching you up front a mass of notions. I’ve recently used ASM to build the next step of my ANTLR4 Maven tutorial: an essential compiler that translates parsed expressions into java classes (i.e. .class files). I point you to this branch if you want to take a look at the complete source code.
A lot of cool staff out there uses ASM, in particular Groovy and Clojure, just to mention two main representatives of the JVM languages world, use ASM to compile to class files.
Before starting using ASM a couple of preparatory activities are needed. The first is intalling the Bytecode Outline plugin for Eclipse. This will become your main educational tool. The most useful thing that it can do is generating the source code of a Java class that will output the bytecode of another Java class. To be more clear, if you want to know how to generate the bytecode for a certain class, or method, or block, etc…, you write the source code of the Java class whose bytecode you would like to create, then you inspect it with the Bytecode Outline plugin, and it generates the Java code that you should write in order to builds the corresponding bytecode.
Imagine that I want to output the bytecode that corresponds to the following Java class:
public class SimulatedCompiledExpression
{
	public double compute(){
		return compute_0();
	}

	public double compute_0(){
		return compute_01() * compute_02();
	}

	public double compute_01(){
		return 2.0D;
	}

	public double compute_02(){
		return 3.0;
	}
}
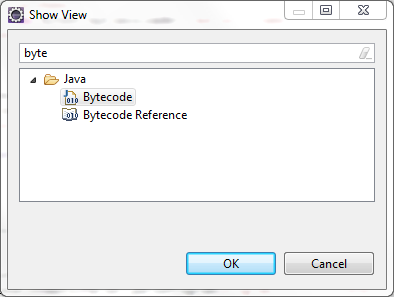
once I have written and compiled the class in Eclipse, I open the Bytecode view (Window -> Show View)
and it tells me this:
If you take the Java class generated on the right panel, compile it and call its dump method, what you get is the bytecode corresponding to the SimulatedCompiledExpression class.
The second preparatory step is specific to my example. Since you want to be able to test the compiled classes on the fly, a custom class loader is useful that could load a class directly from its raw byte array representation. It did something very basic but it’s enough to allow unit tests:
package org.merka.arithmetic.classloader;

import org.apache.commons.lang.StringUtils;

public class ByteArrayClassLoader extends ClassLoader
{
	private byte[] rawClass;
	private String name;
	private Class<?> clazz;

	public ByteArrayClassLoader(byte[] rawClass, String name)
	{
		if(StringUtils.isBlank(name)){
			throw new IllegalArgumentException("name");
		}
		if(rawClass == null){
			throw new IllegalArgumentException("rawClass");
		}
		this.rawClass = rawClass;
		this.name = name;
	}

	@Override
	protected Class<?> findClass(String name) throws ClassNotFoundException
	{
		if(this.name.equals(name)){
			return defineClass(this.name, this.rawClass, 0, this.rawClass.length);
		}
		return super.findClass(name);
	}
}
Maven dependency for ASM
To have the full power of ASM at your disposal in a Maven project, add the following dependency in the pom.xml file:
<dependency>
    <groupId>org.ow2.asm</groupId>
    <artifactId>asm-all</artifactId>
    <version>${asm.version}</version>
</dependency>
The latest version (and the one I used in this tutorial) is 5.0.4.
Compilation
The idea for this example is to translate every production of the language in a method that returns the result of the evaluation of the correspondig subtree. I know it’s totally useless but, again, this is just a tutorial to learn how ASM works. I’ve never claimed that the entire arithmetic example was practically usefull in the first place.
Having an expression like “2 * 3”, I would like to create a class that corresponds to the one I’ve just reported previously (look at the SimulatedCompiledExpression above). Every time I did not know how to use the ASM APIs to accomplish my task, I just wrote the Java code correspondig to the ideal result I wanted, checked with Bytecode Outline and then went back to my bytecode generation code.
The actual work of translating expressions into bytecode is done by the NaiveCompilerVisitor. For each significant production, it creates a method that computes and returns the value of its subtree. The visitor is defined as a subclass of ArithmeticBaseVisitor because each visit method returns the name of the method it just created, so that it can be used by the parent level.
Let’s see some code:
	public String visitProgram(ProgramContext ctx)
	{
		// builds the prolog of the class
//		FieldVisitor fv;
		MethodVisitor mv;
//		AnnotationVisitor av0;

		traceClassVisitor.visit(V1_7, ACC_PUBLIC + ACC_SUPER,
				getQualifiedName(), null, "java/lang/Object",
				null);

		traceClassVisitor.visitSource(className + ".java", null);

		// builds the default constructor
		{
			// [here goes the code obtained from the bytecode outline,
			//   slightly modified to fit our needs]
			mv = traceClassVisitor.visitMethod(ACC_PUBLIC, "<init>", "()V", null, null);
			mv.visitCode();
			Label l0 = new Label();
			mv.visitLabel(l0);
			//mv.visitLineNumber(3, l0);
			mv.visitVarInsn(ALOAD, 0);
			mv.visitMethodInsn(INVOKESPECIAL, "java/lang/Object", "<init>", "()V", false);
			mv.visitInsn(RETURN);
			Label l1 = new Label();
			mv.visitLabel(l1);
			mv.visitLocalVariable("this", getStackQualifiedName(),
					null, l0, l1, 0);
			mv.visitMaxs(1, 1);
			mv.visitEnd();
		}

		// passes itself into the child node
		String innerMethodName = ctx.expression().accept(this);

		// creates a top level method named "compute"
		// that internally calls the previous generated innerMethodName
		{
			// [here goes the code obtained from the bytecode outline,
			//   slightly modified to fit our needs]
			mv = classWriter.visitMethod(ACC_PUBLIC, "compute", "()D", null, null);
			mv.visitCode();
			Label l0 = new Label();
			mv.visitLabel(l0);
			//mv.visitLineNumber(14, l0);
			mv.visitVarInsn(ALOAD, 0);
			mv.visitMethodInsn(INVOKEVIRTUAL, getQualifiedName(), innerMethodName, "()D", false);
			mv.visitInsn(DRETURN);
			Label l1 = new Label();
			mv.visitLabel(l1);
			mv.visitLocalVariable("this", getStackQualifiedName(), null, l0, l1, 0);
			mv.visitMaxs(2, 1);
			mv.visitEnd();
		}

		// build the epilog of the class
		traceClassVisitor.visitEnd();
		return "compute";
	}
The code in the top level visit method shown here, writes the bytecode that defines a class, a default constructor and a public method named “compute”. The result of this code alone, translated in Java, would look like this:
public class <TheClassName>;
{
	public double compute(){
		return compute_0(); // "compute_0" is the name returned by ctx.expression().accept(this), see line 35 of the previous snippet
        }
}
At line 35 you see the visitor starting the recursion into the subtree. Each subnode, once visited, enriches the class with a new method and returns the name of it, so that it can be employed by the parent level. At the end of the visit, the getRawClass method of the NaiveCompilerVisitor returns the raw byte representation of the class: it can be saved as a .class file (then it becomes a totally legitimate class) or loaded on the fly by the ByteArrayClassLoader.
Let’s see another visit method. From now on you can realize that the code is really similar to that of NaiveInterpreterVisitor:
public String visitAlgebraicSum(AlgebraicSumContext ctx)
	{
		int byteCodeOp = -1;
		String operand = ctx.getChild(1).getText();
		if(operand.equals("+")){
			byteCodeOp = DADD;
		}
		else if(operand.equals("-")){
			byteCodeOp = DSUB;
		}
		else
		{
			throw new ArithmeticException("Something has really gone wrong");
		}

		String leftArgumentMethod = ctx.expression(0).accept(this);
		String rightArgumentMethod = ctx.expression(1).accept(this);

		// builds a method whose body is
		// 'return <leftArgumentMethod>() + rightArgumentMethod()'

		String currentMethodName = getNextMethodName();
		MethodVisitor methodVisitor;
		{
			methodVisitor = classWriter.visitMethod(ACC_PUBLIC, currentMethodName, "()D", null, null);
			methodVisitor.visitCode();
			Label l0 = new Label();
			methodVisitor.visitLabel(l0);

			methodVisitor.visitVarInsn(ALOAD, 0);
			methodVisitor.visitMethodInsn(INVOKEVIRTUAL, getQualifiedName(), leftArgumentMethod, "()D", false);
			methodVisitor.visitVarInsn(ALOAD, 0);
			methodVisitor.visitMethodInsn(INVOKEVIRTUAL, getQualifiedName(), rightArgumentMethod, "()D", false);
			methodVisitor.visitInsn(byteCodeOp);
			methodVisitor.visitInsn(DRETURN);
			Label l1 = new Label();
			methodVisitor.visitLabel(l1);
			methodVisitor.visitLocalVariable("this", getStackQualifiedName(), null, l0, l1, 0);
			methodVisitor.visitMaxs(4, 1);
			methodVisitor.visitEnd();
		}

		return currentMethodName;
	}
The idea is the same: first we visit each subtree of the AlgebraicSumContextNode. Each visit creates a method in the output bytecode and returns its name to the parent level. Then we use those names in the generation of the current method (line 31 and 33). As the comment states, the goal here is to have a bytecode method whose body is equivalent to the Java statement:
return <leftArgumentMethod>() (+ | -) <rightArgumentMethod>();
Test
A unit test might help understand how such a visitor can be used by client code:
	@Test
	public void testWriteClass() throws Exception
	{
		String program = "1 + 1 + 1 * 2 * (4+2) * 2 - (1 + 1 - 4 + 1 +1 ) * 2 / 3 / 3 / 3"; // "4 + 1";
		TestArithmeticParser.ArithmeticTestErrorListener errorListener = new TestArithmeticParser.ArithmeticTestErrorListener();
		ProgramContext parseTreeRoot = TestArithmeticParser.parseProgram(program, errorListener);

		NaiveCompilerVisitor visitor = new NaiveCompilerVisitor("org.merka.onthefly",
				"CompiledExpression");

		visitor.visit(parseTreeRoot);
		byte[] rawClass = visitor.getRawClass();

		File file = new File("target/org/merka/onthefly/CompiledExpression.class");
		FileUtils.writeByteArrayToFile(file, rawClass);
	}
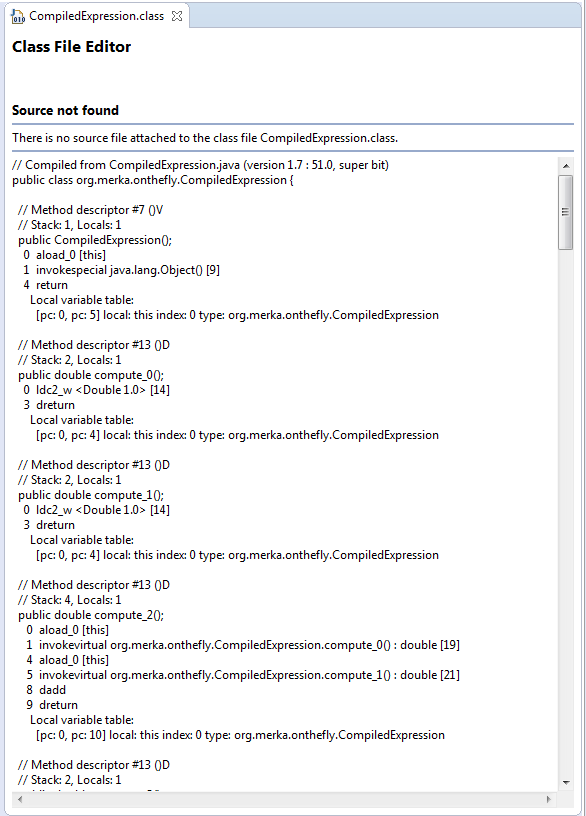
As usual, first we parse the program (line 6) then we create an instance of the compiler visitor that takes as parameter the name of the package and the simple name of the class to be generated (line 8). We visit the parse tree (line 11), then we get the resulting bytecode as a byte array (line 12). This is the actual content of a class file. We can save it to a file inside the expected folder structure (line 15): now we can use this class as we would do with any other class. In fact, you can also try and open it in Eclipse, and this is what you get:
nice and valid java bytecode.
On the other side, you can generate and load classes on the fly. To do this, I use my custom ByteArrayClassLoader and a bit of reflection, since none of the generated types are known at compile time:
	@Test
	public void testOnTheFly() throws Exception
	{
		String tempPackage = "org.merka.onthefly";
		String program = "2 + 3";
		double result = evaluateClassOnTheFly(program, tempPackage, "CompiledSum");
		assertEquals("result of current program: '" + program + "'", 5, result, 0.00001);
	}

	public double evaluateClassOnTheFly(String program, String packageName, String className) throws Exception
	{
		TestArithmeticParser.ArithmeticTestErrorListener errorListener = new TestArithmeticParser.ArithmeticTestErrorListener();
		ProgramContext parseTreeRoot = TestArithmeticParser.parseProgram(program, errorListener);

		NaiveCompilerVisitor visitor = new NaiveCompilerVisitor(packageName,
				className);

		visitor.visit(parseTreeRoot);
		byte[] rawClass = visitor.getRawClass();
		String name = packageName + "." + className;
		ByteArrayClassLoader classLoader = new ByteArrayClassLoader(rawClass, name);
		Class<?> compiledClass = classLoader.loadClass(name);

		assertNotNull(compiledClass);

		Object instance = compiledClass.newInstance();
		Class<?>[] parameterTypes = new Class<?>[0];
		Method computeMethod = compiledClass.getMethod("compute", parameterTypes);
		Object[] args = new Object[0];
		double result = (double) computeMethod.invoke(instance, args);
		return result;
	}


