Pentaho Community Meeting 2015

Announcement! Announcement!

pcm-2015-logo

On the 7th of November, 2015, I will be presenting at the Pentaho Community Meeting (PCM) that will be held in London.

I and my former colleague Francesco Corti will be presenting a plugin for Pentaho that allows an external web application to transparently have a user authenticated in Pentaho.

For further details about the meeting check this out.

Some details about the project

The project is an extension to the security and authentication layer of Pentaho and the related Spring Security filter chain. The basic need behind the project is allowing an external application to redirect a user to Pentaho, without him (or her) having to type the username and password, much like in a single sign on fashion, but without the hassle of a fully featured SSO infrastructure.

The final name of the plugin is yet to be decided but it will probably be “Pentaho Transparent Authentication”, although at the moment the Java project’s name is “pentaho-authentication-ext”. The final name is Pentaho Transparent Authentication.

The source code of the project is available here. Please keep in mind that it is still under active development.

Francesco has already written an excellent guide on how to install, use and test the plugin. Take a look!

We expect to release the plugin to the Pentaho Marketplace in the following weeks, right before the presentation, so that it will be immediately available for everyone to try out. Despite what the readme file says, there will be a shiny and fancy installer in the form of a Sparkl application. [EDIT: the installer is in place and the releases 1.0 (for Pentaho 5.4) and 1.1 (for Pentaho 6.0) have been published on Github. We are currently waiting for the review and approval process of the Pentaho Marketplace. In the meanwhile, you can download and unpack the zip file into the system folder of a Pentaho instance. Refer to the readme file and to the aforementioned guide for further instructions]

If you have any curiosities or feedbacks, please do not hesitate to leave a comment.

I began using Eclipse Mars and…

Today I downloaded and started using the latest version of Eclipse, called Mars. I began with a copy of a project I’m currently working on, a Java Web application that uses, among the other things, Java Persistence API (JPA) and Hibernate.

The first things I saw after importing the project into the workspace was this:

jpa1

On any class annotated with @Entity that used a @GeneratedValue on its primary key field. Not a good start…

The reported error was:

No generator named “increment” is defined in the persistence unit.jpa2

…even if the generator is defined right there with the @GenericGenerator annotation.

I searched the Internet for a couple of minutes without success, than the illumination: it’s a validation error. In fact, it does not prevent building the project, nor running it.

This is what you need to do to make the error go away and live easily again: open Windows -> Preferences and filter by “validation”; in the list, search for “JPA”, and uncheck the relative checkboxes. The annoying validation stops being performed.

jpa3

Besides, I’m not even sure that it is an actual error. Eclipse Luna does not report it; Maven, Hibernate, Jetty or Tomcat do not complain about it in any way. Is it a bug of Eclipse Mars? Well, probably I’m not going to research any further on this subject…

My new favourite thing: ASM

[This could also have been titled ANTLR4 project with Maven – Tutorial (episode 4)]

[The full source code is here on github]

Introduction

ASM is:

an all purpose Java bytecode manipulation and analysis framework. It can be used to modify existing classes or dynamically generate classes, directly in binary form. Provided common transformations and analysis algorithms allow to easily assemble custom complex transformations and code analysis tools.

It has several uses but the most remarkable is the ability to easily output Java Bytecode and dump byte array representations of class files.

In order to allow this, ASM has a set of handy APIs and a couple of tools that guides you by examples, rather that teaching you up front a mass of notions. I’ve recently used ASM to build the next step of my ANTLR4 Maven tutorial: an essential compiler that translates parsed expressions into java classes (i.e. .class files). I point you to this branch if you want to take a look at the complete source code.

A lot of cool staff out there uses ASM, in particular Groovy and Clojure, just to mention two main representatives of the JVM languages world, use ASM to compile to class files.

Before starting using ASM a couple of preparatory activities are needed. The first is intalling the Bytecode Outline plugin for Eclipse. This will become your main educational tool. The most useful thing that it can do is generating the source code of a Java class that will output the bytecode of another Java class. To be more clear, if you want to know how to generate the bytecode for a certain class, or method, or block, etc…, you write the source code of the Java class whose bytecode you would like to create, then you inspect it with the Bytecode Outline plugin, and it generates the Java code that you should write in order to builds the corresponding bytecode.

Imagine that I want to output the bytecode that corresponds to the following Java class:


public class SimulatedCompiledExpression
{
	public double compute(){
		return compute_0();
	}
	
	public double compute_0(){
		return compute_01() * compute_02();
	}
	
	public double compute_01(){
		return 2.0D;
	}
	
	public double compute_02(){
		return 3.0;
	}
}

once I have written and compiled the class in Eclipse, I open the Bytecode view (Window -> Show View)

show-view

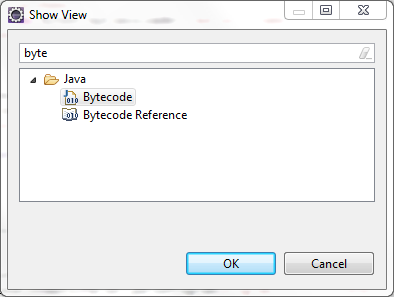
and it tells me this:

bytecode

If you take the Java class generated on the right panel, compile it and call its dump method, what you get is the bytecode corresponding to the SimulatedCompiledExpression class.

The second preparatory step is specific to my example. Since you want to be able to test the compiled classes on the fly, a custom class loader is useful that could load a class directly from its raw byte array representation. It did something very basic but it’s enough to allow unit tests:

package org.merka.arithmetic.classloader;

import org.apache.commons.lang.StringUtils;

public class ByteArrayClassLoader extends ClassLoader
{
	private byte[] rawClass;
	private String name;
	private Class<?> clazz; 
			
	public ByteArrayClassLoader(byte[] rawClass, String name)
	{
		if(StringUtils.isBlank(name)){
			throw new IllegalArgumentException("name");
		}
		if(rawClass == null){
			throw new IllegalArgumentException("rawClass");
		}
		this.rawClass = rawClass;
		this.name = name;
	}
	
	@Override
	protected Class<?> findClass(String name) throws ClassNotFoundException
	{
		if(this.name.equals(name)){			
			return defineClass(this.name, this.rawClass, 0, this.rawClass.length);
		}
		return super.findClass(name);
	}
}

Maven dependency for ASM

To have the full power of ASM at your disposal in a Maven project, add the following dependency in the pom.xml file:


<dependency>
    <groupId>org.ow2.asm</groupId>
    <artifactId>asm-all</artifactId>
    <version>${asm.version}</version>
</dependency>

The latest version (and the one I used in this tutorial) is 5.0.4.

Compilation

The idea for this example is to translate every production of the language in a method that returns the result of the evaluation of the correspondig subtree. I know it’s totally useless but, again, this is just a tutorial to learn how ASM works. I’ve never claimed that the entire arithmetic example was practically usefull in the first place.

Having an expression like “2 * 3”, I would like to create a class that corresponds to the one I’ve just reported previously (look at the SimulatedCompiledExpression above). Every time I did not know how to use the ASM APIs to accomplish my task, I just wrote the Java code correspondig to the ideal result I wanted, checked with Bytecode Outline and then went back to my bytecode generation code.

The actual work of translating expressions into bytecode is done by the NaiveCompilerVisitor. For each significant production, it creates a method that computes and returns the value of its subtree. The visitor is defined as a subclass of ArithmeticBaseVisitor because each visit method returns the name of the method it just created, so that it can be used by the parent level.

Let’s see some code:

	public String visitProgram(ProgramContext ctx)
	{ 
		// builds the prolog of the class
//		FieldVisitor fv;
		MethodVisitor mv;
//		AnnotationVisitor av0;
		
		traceClassVisitor.visit(V1_7, ACC_PUBLIC + ACC_SUPER,
				getQualifiedName(), null, "java/lang/Object",
				null);

		traceClassVisitor.visitSource(className + ".java", null);
		
		// builds the default constructor
		{
			// [here goes the code obtained from the bytecode outline,
			//   slightly modified to fit our needs]
			mv = traceClassVisitor.visitMethod(ACC_PUBLIC, "<init>", "()V", null, null);
			mv.visitCode();
			Label l0 = new Label();
			mv.visitLabel(l0);
			//mv.visitLineNumber(3, l0);
			mv.visitVarInsn(ALOAD, 0);
			mv.visitMethodInsn(INVOKESPECIAL, "java/lang/Object", "<init>", "()V", false);
			mv.visitInsn(RETURN);
			Label l1 = new Label();
			mv.visitLabel(l1);
			mv.visitLocalVariable("this", getStackQualifiedName(),
					null, l0, l1, 0);
			mv.visitMaxs(1, 1);
			mv.visitEnd();
		}
		
		// passes itself into the child node
		String innerMethodName = ctx.expression().accept(this);
		
		// creates a top level method named "compute"
		// that internally calls the previous generated innerMethodName
		{	
			// [here goes the code obtained from the bytecode outline,
			//   slightly modified to fit our needs]
			mv = classWriter.visitMethod(ACC_PUBLIC, "compute", "()D", null, null);
			mv.visitCode();
			Label l0 = new Label();
			mv.visitLabel(l0);
			//mv.visitLineNumber(14, l0);
			mv.visitVarInsn(ALOAD, 0);
			mv.visitMethodInsn(INVOKEVIRTUAL, getQualifiedName(), innerMethodName, "()D", false);
			mv.visitInsn(DRETURN);
			Label l1 = new Label();
			mv.visitLabel(l1);
			mv.visitLocalVariable("this", getStackQualifiedName(), null, l0, l1, 0);
			mv.visitMaxs(2, 1);
			mv.visitEnd();
		}
		
		// build the epilog of the class
		traceClassVisitor.visitEnd();
		return "compute";
	}

The code in the top level visit method shown here, writes the bytecode that defines a class, a default constructor and a public method named “compute”. The result of this code alone, translated in Java, would look like this:

public class <TheClassName>;
{
	public double compute(){
		return compute_0(); // "compute_0" is the name returned by ctx.expression().accept(this), see line 35 of the previous snippet
        } 
} 

At line 35 you see the visitor starting the recursion into the subtree. Each subnode, once visited, enriches the class with a new method and returns the name of it, so that it can be employed by the parent level. At the end of the visit, the getRawClass method of the NaiveCompilerVisitor returns the raw byte representation of the class: it can be saved as a .class file (then it becomes a totally legitimate class) or loaded on the fly by the ByteArrayClassLoader.

Let’s see another visit method. From now on you can realize that the code is really similar to that of NaiveInterpreterVisitor:

public String visitAlgebraicSum(AlgebraicSumContext ctx)
	{
		int byteCodeOp = -1;
		String operand = ctx.getChild(1).getText();
		if(operand.equals("+")){
			byteCodeOp = DADD;
		}
		else if(operand.equals("-")){
			byteCodeOp = DSUB;
		}
		else
		{
			throw new ArithmeticException("Something has really gone wrong");
		}
		
		String leftArgumentMethod = ctx.expression(0).accept(this);
		String rightArgumentMethod = ctx.expression(1).accept(this);
		
		// builds a method whose body is
		// 'return <leftArgumentMethod>() + rightArgumentMethod()'
		
		String currentMethodName = getNextMethodName();
		MethodVisitor methodVisitor;
		{
			methodVisitor = classWriter.visitMethod(ACC_PUBLIC, currentMethodName, "()D", null, null);
			methodVisitor.visitCode();
			Label l0 = new Label();
			methodVisitor.visitLabel(l0);

			methodVisitor.visitVarInsn(ALOAD, 0);
			methodVisitor.visitMethodInsn(INVOKEVIRTUAL, getQualifiedName(), leftArgumentMethod, "()D", false);
			methodVisitor.visitVarInsn(ALOAD, 0);
			methodVisitor.visitMethodInsn(INVOKEVIRTUAL, getQualifiedName(), rightArgumentMethod, "()D", false);
			methodVisitor.visitInsn(byteCodeOp);
			methodVisitor.visitInsn(DRETURN);
			Label l1 = new Label();
			methodVisitor.visitLabel(l1);
			methodVisitor.visitLocalVariable("this", getStackQualifiedName(), null, l0, l1, 0);
			methodVisitor.visitMaxs(4, 1);
			methodVisitor.visitEnd();
		}
		
		return currentMethodName;
	}

The idea is the same: first we visit each subtree of the AlgebraicSumContextNode. Each visit creates a method in the output bytecode and returns its name to the parent level. Then we use those names in the generation of the current method (line 31 and 33). As the comment states, the goal here is to have a bytecode method whose body is equivalent to the Java statement:

return <leftArgumentMethod>() (+ | -) <rightArgumentMethod>();

Test

A unit test might help understand how such a visitor can be used by client code:

	@Test
	public void testWriteClass() throws Exception
	{
		String program = "1 + 1 + 1 * 2 * (4+2) * 2 - (1 + 1 - 4 + 1 +1 ) * 2 / 3 / 3 / 3"; // "4 + 1";
		TestArithmeticParser.ArithmeticTestErrorListener errorListener = new TestArithmeticParser.ArithmeticTestErrorListener();
		ProgramContext parseTreeRoot = TestArithmeticParser.parseProgram(program, errorListener);

		NaiveCompilerVisitor visitor = new NaiveCompilerVisitor("org.merka.onthefly",
				"CompiledExpression");

		visitor.visit(parseTreeRoot);
		byte[] rawClass = visitor.getRawClass();
		
		File file = new File("target/org/merka/onthefly/CompiledExpression.class");
		FileUtils.writeByteArrayToFile(file, rawClass);
	}

As usual, first we parse the program (line 6) then we create an instance of the compiler visitor that takes as parameter the name of the package and the simple name of the class to be generated (line 8). We visit the parse tree (line 11), then we get the resulting bytecode as a byte array (line 12). This is the actual content of a class file. We can save it to a file inside the expected folder structure (line 15): now we can use this class as we would do with any other class. In fact, you can also try and open it in Eclipse, and this is what you get:

bytecode2

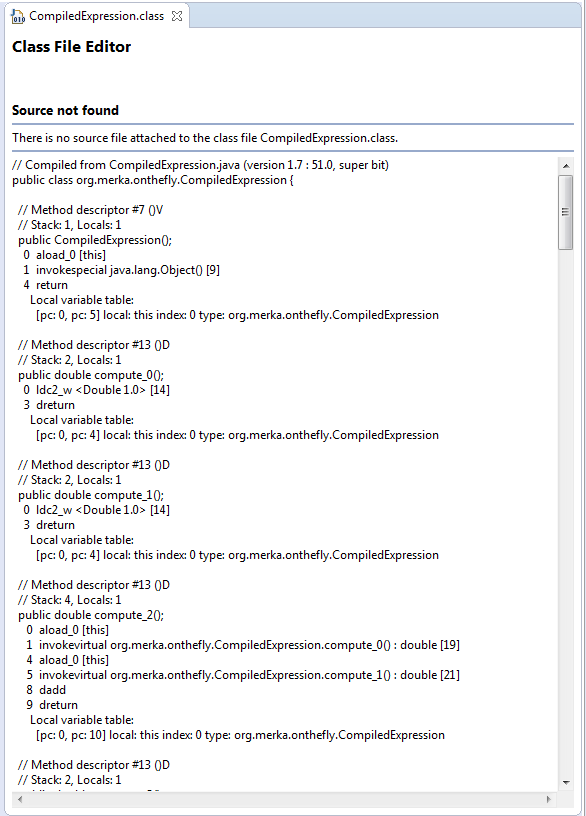
nice and valid java bytecode.

On the other side, you can generate and load classes on the fly. To do this, I use my custom ByteArrayClassLoader and a bit of reflection, since none of the generated types are known at compile time:

	@Test
	public void testOnTheFly() throws Exception
	{
		String tempPackage = "org.merka.onthefly";
		String program = "2 + 3";
		double result = evaluateClassOnTheFly(program, tempPackage, "CompiledSum");
		assertEquals("result of current program: '" + program + "'", 5, result, 0.00001);
	}

	public double evaluateClassOnTheFly(String program, String packageName, String className) throws Exception
	{
		TestArithmeticParser.ArithmeticTestErrorListener errorListener = new TestArithmeticParser.ArithmeticTestErrorListener();
		ProgramContext parseTreeRoot = TestArithmeticParser.parseProgram(program, errorListener);

		NaiveCompilerVisitor visitor = new NaiveCompilerVisitor(packageName,
				className);

		visitor.visit(parseTreeRoot);
		byte[] rawClass = visitor.getRawClass();
		String name = packageName + "." + className;
		ByteArrayClassLoader classLoader = new ByteArrayClassLoader(rawClass, name);
		Class<?> compiledClass = classLoader.loadClass(name);

		assertNotNull(compiledClass);

		Object instance = compiledClass.newInstance();
		Class<?>[] parameterTypes = new Class<?>[0];
		Method computeMethod = compiledClass.getMethod("compute", parameterTypes);
		Object[] args = new Object[0];
		double result = (double) computeMethod.invoke(instance, args);
		return result;
	}

ANTLR4 project with Maven – Tutorial (episode 3)

[Episode 1] [Episode 2] Now for something completely different. During the preparation of episode 3 I changed my mind and thought that the best way to approach the remaining issues (self embedding and AST) was to embrace a classic. So I decided to fall back to the good old arithmetic expressions, since they have proven to be the best didactic test bed for me. I developed a new project from scratch that you can find here on Github. It’s nothing more that an interpreter of arithmetical expressions, built using ANTLR4 and Maven (of course). The projects also contains an object model for an Abstract Syntax Tree (AST) that fits my (our) needs. Please keep in mind that the focus of this episode is on how to define an object model and build an AST for the language. I will take for granted a lot of things that do not fall into this topic. If anything is not clear, well, there is always a comment section… oh and by the way… Disclaimer: This is not a proposal for a best practice. This is just a sharing of a toy project that I made up because I could not find anything similar.

The (labeled) grammar

The grammar that will be used is just a minor variation of the example found here.

grammar Arithmetic;

program : expression ;

expression
	: expression ('*' | '/') expression #Multiplication
	| expression ('+' | '-') expression #AlgebraicSum
	| term #AtomicTerm;

term: realNumber #Number
	| '(' expression ')' #InnerExpression;

 realNumber : NUMBER ('.'NUMBER)?;

WS : [ \t\r\n]+ -&gt; skip ; // skip spaces, tabs, newlines

NUMBER : [0-9]+ ;

What I added is:

  1. Labels (those identifiers preceded by ‘#’);
  2. The missing operands (in the example there are only sum and multiplication).

Labels allow you to name a production out of a set of alternatives, so that you can discriminate among them in the visitors. Let’s take the rule for expression at line 5 as an example: it will produce a visitor interface that contains the following signatures, rather than just a single ‘visitExpression’ method:

        /**
	 * Visit a parse tree produced by the {@code AlgebraicSum}
	 * labeled alternative in {@link ArithmeticParser#expression}.
	 * @param ctx the parse tree
	 * @return the visitor result
	 */
	T visitAlgebraicSum(ArithmeticParser.AlgebraicSumContext ctx);
	/**
	 * Visit a parse tree produced by the {@code Multiplication}
	 * labeled alternative in {@link ArithmeticParser#expression}.
	 * @param ctx the parse tree
	 * @return the visitor result
	 */
	T visitMultiplication(ArithmeticParser.MultiplicationContext ctx);
	/**
	 * Visit a parse tree produced by the {@code AtomicTerm}
	 * labeled alternative in {@link ArithmeticParser#expression}.
	 * @param ctx the parse tree
	 * @return the visitor result
	 */
	T visitAtomicTerm(ArithmeticParser.AtomicTermContext ctx);

Remember that either you label all the alternatives in a production or none: ANTLR does not allow you to name only a few. The ‘expression‘ production introduces two more concepts: self embedding and left recursion. Self embedding happens when a symbol is capable of producing itself. In this case expression does this both directly (as in the AlgebraicSum and Multiplication alternatives) and indirectly (through the term production, with the alternative named InnerExpression). While self embedding is perfectly natural in a programming language (in fact you cannot express nested arithmetical expression without it) and it is, in fact, the characteristic that distinguishes context free languages from regular expressions, left recursion may be a problem for LL parser like the one we are going to build. With JavaCC, for example, you would not be allowed to write a production like expression : expression ‘+’ expression. ANTLR, on the other hand, is able to recognize and resolve direct left recursion. As a desirable consequence of the strategy adopted by ANTLR, the precedence of the productions (which means the resulting precedence of the arithmetical operators) is given by the order in which the alternatives are listed. For example, in our production the Multiplication alternative will have a higher precedence than AlgebraicSum and a string like:


1 + 2 * 3

will produce a parse tree that looks like this (edit — snapshot of the ANTLR plugin for Eclipse):

parsetree1

You have to be aware of this behavior, otherwise you could end up doing the error I did in the first version of my grammar. Initially I wrote the productions in the following manner:

/* Warning: BROKEN GRAMMAR! Do not do this */
expression
	: expression '+' expression #Sum
	| expression '-' expression #Difference
	| multiplicativeExp #Term;

multiplicativeExp
	: multiplicativeExp '*' multiplicativeExp #Multiplication
	| multiplicativeExp '/' multiplicativeExp #Division
	| NUMBER ('.'NUMBER)? #Number
	| '(' expression ')' #InnerExpression;

In this version Sum has a higher precedence than Difference, and Multiplication has precedence over Division: this is not what we want to do.

In this instance, if you parse:


2 + 3 - 5 + 6

you get:

parsetree2

Not quite the right tree.

A “naive” interpreter

The first attempt to interpret the expressions will be a visitor that operates on the concrete parse tree. I call it “naive” because you do not need to define an AST object model: you just traverse the parse tree and “manually” skip all the productions and terminals that you do not care about. The implementation of such a visitor is in the NaiveInterpreterVisitor class. To get an idea, you visit the nodes in the following way:


	public Double visitAlgebraicSum(AlgebraicSumContext context) {
		String operand = context.getChild(1).getText();
		Double left = context.expression(0).accept(this);
		Double right = context.expression(1).accept(this);
		if(operand.equals(&quot;+&quot;)){
			return left + right;
		}
		else if(operand.equals(&quot;-&quot;)){
			return left - right;
		}
		else
		{
			throw new ArithmeticException(&quot;Something has really gone wrong&quot;);
		}
	}

Here we first find what the operator is (remember that the AlgebraicSum node could store a sum or a difference): to do that (line 2) we get the second child of the current node (we know it must be a terminal) and then we get its text representation. In order to find out what the values of the left and right operands are, we pass the visitor (this) into their ‘accept’ method. Note that every “Context” object has convenient methods that correspond to the parsing functions of the related production, so that we can skip the noise of the terminals we do not like to interpret and go straight to the child nodes we care about. As a further example, consider the following method:

	@Override
	public Double visitInnerExpression(InnerExpressionContext context) {
		return context.expression().accept(this);
	}

Knowing how the corresponding production is defined

term: realNumber #Number
	| '(' expression ')' #InnerExpression;

we can skip the ugly parenthesis and immediately pass the visitor into the meaningful subtree.

The AST object model

Depending on the application needs, you may want an AST to represent the parsed strings. Unfortunately, starting from version 4, ANTLR does not provide you anymore with anything to automate this part of the process. Unlike other language recognition tools, it does not generate classes for the AST nodes based on some kind of annotations in the grammar file, nor it makes a parser that is able to build an AST instead of a concrete parse tree (These are things that you can do with JJTree + JavaCC). As I mentioned, It seems to be an aware design decision and this is where we left at the end of the previous episode. In order to work with ASTs, I went through the following steps:

  1. defining an object model for the AST;
  2. writing a visitor of the parse tree that produces a corresponding AST object.
  3. defining a visitor interface for the AST and writing an interpreter that implements that interface.

The object model is very straightforward for our little language. I put the classes in the org.merka.arithmetic.language.ast package. I would also put here a better UML class diagram of the model if I knew a tool that would not take me three hours. Here’s the best that I can do in terms of UML drawing:

ArithUML

Building the AST with a visitor of the concrete parse tree

The approach I took is to use a parse tree visitor to build the AST. You can also use ANTLR listeners instead of visitors, I think it depends much on your needs and personal taste. The builder visitor is implemented in the ASTBuilderVisitor class. It traverses the tree much like the naive interpreter does, skipping all the terminals and the productions that are not meaningful for the abstract syntax. This is an example of an AST node construction:

	@Override
	public ArithmeticASTNode visitAlgebraicSum(AlgebraicSumContext context) {
		String operand = context.getChild(1).getText();
		ArithmeticASTNode leftOperand = context.expression(0).accept(this);
		ArithmeticASTNode rightOperand = context.expression(1).accept(this);
		if(operand.equals(PLUS)){
			return new SumASTNode(leftOperand, rightOperand);
		}
		else if (operand.equals(MINUS)){
			return new DifferenceASTNode(leftOperand, rightOperand);
		}
		else{
			throw new ArithmeticException(&quot;Something has really gone wrong: operand '&quot; + operand +&quot;' comes as a complete surprise&quot;);
		}
	}

As you can see, it’s almost identical to its interpreter counterpart.

The AST based interpreter

Finally we can define a Visitor interface based on the AST:

public interface ArithmeticASTVisitor {

	public Number visitDifference(DifferenceASTNode differenceNode);
	public Number visitDivision(DivisionASTNode divisionNode);
	public Number visitMultiplication(MultiplicationASTNode multiplicationNode);
	public Number visitSum(SumASTNode sumNode);
	public Number visitNumber(NumberASTNode numberNode);
}

Nothing weird here: there is just one method for each concrete node type. We can now write the interpretation methods in a concrete visitor, here’s an extract:

	@Override
	public Number visitSum(SumASTNode sumNode) {
		Number leftOperand = (Number)sumNode.getLeftOperand().accept(this);
		Number rightOperand = (Number)sumNode.getRightOperand().accept(this);
		return leftOperand.doubleValue() + rightOperand.doubleValue();
	}

See the class EvaluationVisitor for the complete code. A side note: an obvious improvement would be to rewrite the grammar so that Sum and Difference, as well as Multiplication and Division, are in different productions, thus producing nodes of different type in the parse tree. That way we could avoid the ugly if – else in the visitSum and visitMultiplication method.

ANTLR4 project with Maven – Tutorial (episode 2)

[The reference tag for this episode is step-0.2.]

At the end of the previous episode we have been able to feed sentences to the parser and find out if they are valid (i.e. belong to the language) or not. In this post I will show you how you can implement a visitor to interpret the language.

At the end of every successful parsing operation, the parser produces a concrete syntax tree. The function parse<StartSymbol> of the parser returns an object of type <StartSymbol>Context, which represents the root node of the concrete syntax tree (it is a structure that follows the classic Composite pattern). In our case, take a look at the testJsonVisitor test method (forget about the “Json” part of the name, the method is named like this by mistake):


 @Test
 public void testJsonVisitor() throws IOException{
    String program = "sphere 0 0 0 cube 5 5 5 sphere 10 1 3";
    TestErrorListener errorListener = new TestErrorListener(); 
    ProgramContext context = parseProgram(program, errorListener);
 
    assertFalse(errorListener.isFail());
 
    BasicDumpVisitor visitor = new BasicDumpVisitor();
 
    String jsonRepresentation = context.accept(visitor);
    logger.info("String returned by the visitor = " + jsonRepresentation);

...
 
 }

After parsing the string, the test method instantiates a visitor object (BasicDumpVisitor) and provides it with the ProgramContext object as the input.

Let’s take a closer look at the visitor. If you use the -visitor option when calling the preprocessor, ANTLR, alongside with the parser, generates for you a basic interface for a visitor that can walk the concrete syntax tree. All you have to do is implementing that interface and make sure that the tree nodes are visited in the right order.

I created the BasicDumpVisitor class, the simplest visitor that I could think of: it walks the tree and creates a string (also known as “a program”) that, once parsed, gives back the visited tree. In other words it just dumps the original program that created the current contrete syntax tree.

The base visitor interface is declared as follows:


public interface ShapePlacerVisitor<T> extends ParseTreeVisitor<T>

The name’s prefix (ShapePlacer) is taken from the name of the grammar, as defined in the grammar source file. The interface contains a “visit” method for each node type of the parse tree, as expected. Moreover, it has a bunch of extra methods inherited by the base interface ParseTreeVisitor: see the source code to get an idea, they are quite self-explanatory. I report here one of the “visit” methods as an example. The other ones in the class follow a similar logic:


	public String visitShapeDefinition(ShapeDefinitionContext ctx) {
		StringBuilder builder = new StringBuilder();
		for (ParseTree tree : ctx.children){
			builder.append(tree.accept(this) + " ");
		}
		builder.append("\n");
		return builder.toString();
	} 

The interface is parametric: when you implement it, you have to specify the actual type: that will be the return type of each “visit” method.

So far, I have always written about “concrete syntax tree”. When we deal with interpreted languages, we usually want to manipulate an Abstract Syntax Tree (AST), that is, a tree structure that omits every syntactic detail that is not useful to the interpreter and can be easily inferred by the structure of the tree itself. In the case of our language, if we have, say, the string “sphere 1 1 1”, the parser creates for us a tree that looks like this:

  • program
    • shapeDefinition
      • sphereDefinition
        • SPHERE_KEYWORD
        • coordinates
          • NUMBER [“1”]
          • NUMBER [“1”]
          • NUMBER [“1”]

That is not ideal since, when it comes down to interpretation, we may want to work with something that looks like this:

  • sphereDefinition
    • coordinates
      • 1
      • 1
      • 1

or, depending on your needs, something even simpler, for example:

  • sphere definition
    • (1, 1, 1)

Unfortunately ANTLR 4, unlike its previous versions, does not allow for tree rewriting in the grammar file. As far as I know, this is a precise design decision. So, if you want to work with an AST of your invention, you have to build it yourself, i. e. you have to write the tree node classes and the code that traverses the concrete syntax tree and builds the AST. Hopefully, I will cover this case in the next episode.

ANTLR4 project with Maven – Tutorial (episode 1)

Introduction

I’ve always been fascinated by Language Theory and the related technologies. Since I have been prevalently a Java guy, I used to use Javacc and JJTree to build parsers and interpreters. Nowadays it seems that the big name in the field of language recognition is ANTLR. I have wanted to learn more about ANTLR for a long time and lately I finally had the opportunity to spend some time on it. I thought it would have been a good idea to share the sample projects I created in the process.

I plan to write at least three parts:

  1. Setup of the project with all the basic pieces working.
  2. Implementation of a visitor.
  3. Grammar refinement to include self-embedding and implementation of a second visitor.

Through this series I will design a language to give the specification of the position of some geometrical shapes that will be used later to add shapes to the gravity simulator 3D scene (at least this is the idea).

The whole source code is available for download at https://github.com/Rospaccio/learnantlr. The project contains some tags that are related to the various episodes of the tutorial (unfortunately not always with the corresponding sequence number, but I will make sure to reference the right tag for each episode).

Disclaimer: this is not a comprehensive guide to ANTLR and I am not an expert in the field of Language Theory nor in ANTLR. It’s just a sharing of my (self) educational process. The focus is almost entirely on the setup of a build process through Maven, not on the internals of ANTLR itself nor the best practices to design a grammar (though I will occasionally slip on that topics).

Project setup (Git tag: v0.1)

Outline:

  1. first version of the language;
  2. basic pom.xml;
  3. specification of the grammar;
  4. first build.

First version of the language

the first version of the language is going to be very trivial and it is supposed to be just a pretext to show how a possible pom looks like. We want to be able to recognize strings like the following:

cube 0 0 0
sphere 12 2 3
cube 1 1 1
cube 4 3 10
<etc...>

where the initial keyword (“cube” or “sphere”) specifies the nature of the shape and the following three number specify the coordinates of the shape in a three dimensional space.

Basic POM

ANTLR has a very good integration with Maven: every necessary compile dependency is available from the central repository. Plus, there’s a super handful plugin that invokes the antlr processor, thus it is possible to define and tune the entire build process through the pom.xml file. But enough of these words, let’s vomit some code.

You can start the project as a default empty Maven project with jar packaging. First, you need to add the ANTLR dependency in your pom.xml file. Here’s the fragment:

<properties>
	<antlr4.plugin.version>4.5</antlr4.plugin.version>
	<antlr4.version>4.5</antlr4.version>
</properties>
<dependencies>
	<dependency>
		<groupId>org.antlr</groupId>
		<artifactId>antlr4-runtime</artifactId>
		<version>${antlr4.version}</version>
	</dependency>

	<dependency>
		<groupId>org.antlr</groupId>
		<artifactId>antlr4-maven-plugin</artifactId>
		<version>${antlr4.plugin.version}</version>
	</dependency>
</dependencies>

Here I am using version 4.5, which is the latest available at the time I am writing, because it supports Javascript as a target language, a feature that I am going to use later in the tutorial.

The first dependency, antlr4-runtime, as the name suggests, is the runtime support for the code generated by ANTLR (basically it’s what you need to compile the generated code and execute it). It contains the base types and classes used by the generated parsers.

The second, antlr4-maven-plugin, is the plugin that can be used in the “generate-sources” phase of the build. To actually use it, the following fragment is also needed:

<build>
	<plugins>
		<plugin>
			<groupId>org.antlr</groupId>
			<artifactId>antlr4-maven-plugin</artifactId>
			<version>${antlr4.plugin.version}</version>
			<configuration>
				<arguments>
					<argument>-visitor</argument>
					<!-- <argument>-Dlanguage=JavaScript</argument> -->
				</arguments>
			</configuration>
			<executions>
				<execution>
					<goals>
						<goal>antlr4</goal>
					</goals>
				</execution>
			</executions>
		</plugin>
	</plugins>
</build>

Note that you can pass argument to the ant command: I user the -visitor option because it generates a handful interface that you can implement in a Visitor class for the parse tree.

Specification of the grammar

In order to have something that makes sense, let’s add a grammar file in the appropriate folder. Create the file (in this case ShapePlacer.g4) inside src/main/antlr4. Make also sure to build a folder structure that mimic the package structure that you want for the generated classes. For example, if you place the grammar file inside src/main/antlr4/org/my/package, the generated classes will belong to the package with name org.my.package.

Here’s our first grammar:

grammar ShapePlacer;
program : (shapeDefinition)+ ;
shapeDefinition : sphereDefinition | cubeDefinition ;
sphereDefinition : SPHERE_KEYWORD coordinates ;
cubeDefinition : CUBE_KEYWORD coordinates ;
coordinates : NUMBER NUMBER NUMBER ;
SPHERE_KEYWORD : 'sphere' ;
CUBE_KEYWORD : 'cube' ;
NUMBER : [1-9]+ ;
WS : [ \t\r\n]+ -> skip ; // skip spaces, tabs, newlines ;

Not a very interesting language, but we must only try and see if the build works.

First build

In order to do that, type mvn clean package in a terminal window and see what happens.

What’s happend

During the generate-sources phase of the Maven build (i.e. certainly before compile), the ANTLR plugin is activated and its default goal (“antlr4”) is called. It invokes the antlr4 processor on the grammar file (by default, it looks recursively inside src/main/antlr4 and compiles every .g4 files it finds). If the goal executes with no error, the generated source files are placed in target/generated-sources/antlr4, and they are automatically taken into account for the compile phase.

As we do not have any manually-written source file yet, only the generated files are compiled and included in the jar.

Test

Let’s try and test the parser. To do that we can add a JUnit test case with a test that looks like the following (please browse the source code to find out more about details like the TestErrorListener class):

@Test
	public void testExploratoryString() throws IOException {

		String simplestProgram = "sphere 12 12 12 cube 2 3 4 cube 4 4 4 sphere 3 3 3"

		CharStream inputCharStream = new ANTLRInputStream(new StringReader(simplestProgram));
		TokenSource tokenSource = new ShapePlacerLexer(inputCharStream);
		TokenStream inputTokenStream = new CommonTokenStream(tokenSource);
		ShapePlacerParser parser = new ShapePlacerParser(inputTokenStream);

		parser.addErrorListener(new TestErrorListener());

		ProgramContext context = parser.program();

		logger.info(context.toString());
	}

Fear Driven Development – Enterprise Induced Worst Practices (part 0)

The Internationalization Antipattern

Some years ago I was still working for Big Time Consulting but I was not even a proper employee. I was a contractor from a company owned by BTC. Well, you figure out the real names. I was sort of an in shore indian developer. We had this huge system built upon Liferay. The system was composed of hundreds of portlets, scattered across tens of WARs. The portal was heavily customized. The language strings for every portlet were all defined in a single Language.properties file at the portal level. That’s right: WARs did not have their own Language file: everything was defined centrally. That meant that if you needed to change the label of a button, you had to modify the portal Language file, build an artifact that belonged to the architectural sector of the system (i.e. it impacted ALL the portlets) and then, once deployed, restart the servers involved in the process.

Nowhere along this path there was an automated test.

As you might imagine, quite often things went wrong. The less severe issue that you could get was the total replacement of the Language strings with their corresponding keys (that was the default behavior in that version of Liferay: if the string was not found, it was simply set to its key). So, after the reboot, everything on every page looked something like “add.user.button.text”, “customer.list.title”, “user.not.found.error.message” and so on. Everywhere. In every single application. The default reaction in the team was “The Strings have been fucked up. Again.”

On the extreme end of the spectrum there was a funny set of poltergeist bugs. Mysterious NoClassDefFoundError, ClassCastException, Liferay showing a bare white page, Liferay showing every graphical component in the wrong place, portlets not deploying, etc…

After being forced to spend a couple of looong evenings to fix this issue (Did I mention that the entire process of compiling, packaging and deploying was excruciatingly long?) I learned my lesson: never mess with the strings again. I decided to apply my personal internationalization antipattern: always include a default value for every string with

LanguageUtil.get(Locale locale, String key, String defaultValue)

and don’t even try to package the architectural artifact (AA, from now on). Just modify and commit the Language file. Then deploy the WAR: the next day the strings magically appear on the screen, and nobody will ever notice that they are hardcoded. Wait until the next release cycle of the AA to have the strings file available. Luckily you won’t be the one needing to deploy it so, if something goes wrong, you can blame someone else and save your evenings.

Pivotal Web Services trial

Preconditions: Windows 7.

The Story:

Yesterday I received an invitation for a two-month free trial of the rising Pivotal Web Services. It’s kinda OpenShift, kinda Azure, etc. but with a bit of hipster style blended in. Just a bit.

Since the very first moment that I knew something about this service, I have been very intrigued by the promise that you can simply type something like

deploy just-this-war.war

in you terminal window and have your application up and running in the Internet. Something that I have been searching for since a looong time ago. I do not know why they sent me the invitation and I do not even remeber when I asked for it (It was probably a late drunk friday night) but here it is. Today I found some time to try the wordeful and valuable capabilities that Pivotal provides you with.

Sadly, the beginning has not been one of the most memorable. Or probably it has been, but in a not-so-positive sense. Just like OpenShift, Pivotal Web Services (PWS), require that you install some client side command line utilities to remotely manage your applications. Unlike OpenShift though, you do not have to go through an infinite sequence of installations. In this case you just have to install their little tiny lighweight client: cf.exe (cf stands for Cloud Foundry, I guess). Don’t get me wrong, it is a great improvement with respect to the paramount load of things that you have to install in order to manage your OpenShift instance. The only problem is that, once you’ve run the cf installer, no known command works anymore. “mvn package something“? No way: “mvn is not recognized as an internal or external command, operable program or batch file“. What?! Even if you type “cmd” you get the same laconic answer. You could already figure out the problem: the cf installer completely erases the ‘path’ environment variable. If you have been working with your machine for almost two years, as I did, installing tons and tons of programs, tools and utilities, this puts you in a very uncomfortable situation.

Luckily I found a solution to this problem online. Thank you to the guy who answered and thank you Internet. This saved me a lot of troubles.

At this point I was a bit upset, as you might imagine. But!… When the cf command is set up and working properly, the steps to deploy a Java webapp are the following:

first, tell cf which API endpoint to use with the command

cf api api.run.pivotal.io

then, you have to log in with:

cf login

API endpoint: https://api.run.pivotal.io

Username> xxx.xxx@gmail.com

Password>
Authenticating...
OK

API endpoint: https://api.run.pivotal.io (API version: 2.2.0)
User: xxx.xxx@gmail.com
Org: xxx
Space: stubgen

and, finally, the real magic:

cf push stubgen -p <path-to-your-war-file>

and voilà, the application is deployed and works like a charm.

Easy deployment made hard

I recently started “evaluating” OpenShift, the fanta-mega-giant cloud offer by Red Hat. OpenShift basically offers you what most so called cloud services offer today: virtual servers that you can remotly manage with a certain degree of autonomy. What took me to OpenShift was the fact that I was searching for a way to host a Java EE web application, possibly with a free basic plan. My initial idea was to find a provider of a simlple Tomcat 7 or 6 and a basic way to upload a WAR file. This requirement has turned out to be surprisingly hard to meet. So long, OpenShift has been the only platform to be able to satisfy me but it has been anything but easy to achieve.

OpenShift is capable of hosting a vast range of applications, spanning from PHP to Ruby On Rails, with almost anything you can imagine in the middle. One of the options is JBoss EWS, a profile that is able to host Tomcat which, in turn, can contain your applications.

Once you have your account you are in Red Hat territory and you have to follow their rules. It can take quite a long time to get started, especially if it is the first time that you do that. First, you have to install on your machine a lot of stuff to enable the development tools necessary to upload the applications and manage the server. Note: you have to install stuff to be able to install the OpenShift tools. Once you are done with Ruby, ssh and the rhc utility, you can create an application and start coding.

The basic configuration of the application is decided by OpenShift: you choose the name, OS choose all the rest. It creates a remote Git repository with a directory tree for your project and a Maven pom file for managing the build process. Now, if you have not already given up, you can clone the project and start coding on your dev machine. So OS gives you anything: a Git repo, an application server for deploying, a build process and a standard directory structure for your source files. Whenever you want to deploy your application remotely, you can do a “git push”: the server will automaticaly recognize the changes, start a build and, if anything goes right, deploy the resulting war. Seems easy, doesn’t it? Nop.

OS gives you much. It actually gives you too much. What if I have a preexistent project, possibly connected with another repository, and with dependencies from other projects? I just want to deploy the fucking war and see what happens, ok? I don’t what to spend three hours trying to figure out how I can map it all on the project created by OS. And I am sincerely thankful, OpenShift, for your commitment in making me aware of the advantages of continuous integration, but I just wanted to deploy the war, please.

I finally figured out that this is the answer to all my problems. The only thing is: you better read all the thread, because the final post is foundamental: you have to tell JBoss to unpack the war.

Loading from the stream

For as long as I have been searching for, I have not found anything like a JarInputStreamClassLoader. That is, or at least that would have been in my intent, a ClassLoader that takes a stream corresponding to a Jar file and load classes from that. Why would I need something like that?, you may ask. Because I want to send a jar file to a server (via a servlet, a web service, or whatever is reachable by TCP/IP) as a stream of bytes, and have the server dynamically load classes from it (why do I want to do that? I will explain later). Maybe it really does not exist anywhere or, more probably, I have not searched hard enough. If you know about anything like that, please let me know in the comments.

However, the fact is: I decided to build it myself since I was actually doing this for training and learning purposes and, most important, I took it as a challenge: aren’t you really preventing me from doing it, Java, are you?

Actually there is the very useful java.net.URLClassLoader that works perfectly with the URL of a jar file. So, if you can receive the stream on the server and save it locally as a jar file, you are done. The problem was that I wanted to accomplish the task in a Google Application Engine webapp, an environment that does not let you to write on the local file system (unless you use their storage API, but it is basically your database interface and I did not want to use it for this task). So I needed to do the thing in memory. I can better explain the feature that I wanted to obtain with a JUnit test case:

	@Test
	public void testLoadStupidClass() throws FileNotFoundException, IOException, ClassNotFoundException
	{
		String pathname = "/Temp/stupidDTO-lib.jar";
		File inputFile = new File(pathname);
		JarInputStream jarStream = new JarInputStream(new FileInputStream(inputFile));
		JarInputStreamClassLoader loader = new JarInputStreamClassLoader(jarStream);
		Class<?> clazz = loader.loadClass("org.xxx.stupiddto.StupidPOJO");
		assertTrue(clazz != null);
	}

Imagine that instead of loading the stream from a file you already have a stream, in the form of an input stream of a servlet request, and that’s it:

protected void doPost(HttpServletRequest req, HttpServletResponse resp) throws ServletException, IOException
	{
		StringBuilder builder = new StringBuilder("loading...");
		JarInputStream jarStream = null;
		try
		{
			jarStream = new JarInputStream(new ByteArrayInputStream(ServletUtils.getHttpRequestBody(req.getInputStream())));
...

of course, it takes a bit of work to extract the jar data from the http request InputStream, and the work is performed by the ServletUtils.getHttpRequestBody (I’m not gonna show you the implementation here, since I have done that in a quite dirty way and I am not proud of it. I will return on that later).
The JarInputStreamClassLoader itself is quite simple once you have uderstood how to cycle on the entries of a JarInputStream and to properly load the raw bytes of each class. The hard thing, for me, has actually been extracting the jar data from the InputStream of the request.
Here is the complete code of the JarInputStreamClassLoader that I implemented:

package org.xxx.mockgen.web.classloader;

import java.io.ByteArrayOutputStream;
import java.io.IOException;
import java.util.List;
import java.util.jar.JarEntry;
import java.util.jar.JarInputStream;

/**
 * Loads a class from a byte array representing the content of a jar file
 *
 */
public class JarInputStreamClassLoader extends ClassLoader
{
	private JarInputStream inputStream;
	protected RawClassList rawClasses;

	protected RawClassList getRawClasses()
	{
		return rawClasses;
	}

	protected void setRawClasses(RawClassList rawClasses)
	{
		this.rawClasses = rawClasses;
	}

	protected JarInputStream getInputStream()
	{
		return inputStream;
	}

	protected void setInputStream(JarInputStream inputStream)
	{
		this.inputStream = inputStream;
	}

	public JarInputStreamClassLoader(JarInputStream jarStream) throws IOException
	{
		JarEntry entry = null;
		// JarInputStream stream = getInputStream();
		setRawClasses(new RawClassList());
		while ((entry = jarStream.getNextJarEntry()) != null)
		{
			String entryName = entry.getName();
			int lastIndexOf = entryName.lastIndexOf(".class");
			String classCandidateName = "";
			if(lastIndexOf != -1)
			{
				classCandidateName = entryName.replace('/', '.').substring(0, entryName.lastIndexOf(".class"));
			}
			if (!classCandidateName.isEmpty())
			{
				ByteArrayOutputStream classBytesStream = new ByteArrayOutputStream();
				byte[] read = new byte[256];
				while (jarStream.read(read) != -1)
				{
					classBytesStream.write(read);
				}

				byte[] rawClassBytes = classBytesStream.toByteArray();
				RawClass rawClass = new RawClass(rawClassBytes, classCandidateName);
				getRawClasses().add(rawClass);
			}
		}
	}

	@Override
	protected Class<?> findClass(String name) throws ClassNotFoundException
	{
		Class<?> clazz = null;

		for (RawClass rawClass : getRawClasses())
		{
			String className = rawClass.getName();
			if (name.equals(className))
			{
				byte[] rawClassBytes = rawClass.getRawClassBytes();
				clazz = defineClass(name, rawClassBytes, 0, rawClassBytes.length);
				break;
			}
		}
		if (clazz == null)
		{
			throw new ClassNotFoundException("Class " + name + " not found.");
		}
		return clazz;
	}

	public List getAvailableClasses()
	{
		return getRawClasses().getClassesNames();
	}
}

The RawClass class is a very simple one: it stores the name and the raw bytes of each class entry found in the jar input stream. The RawClassList class is nothing more than a typed wrapper of ArrayList.
Lines from 43 to 65 of JarInputStreamClassLoader are the key: it iterates through the entries of the jar input stream and, if it finds that the entry is a java class, it stores it in a RawClass object for future use. The remainder of the class (method findClass) is just standard Java class loading.